Part 2
Raising Fry
Duncan Griffiths
If you thought the tricky business of spawning koi seemed difficult this pales into insignificance when compared to raising koi fry. Once you have your newly hatched fry from your first spawning, you will need ample space to keep them along with ample water volume plus a good, but slow filtration system with lots of oxygen and heat and plenty of bowls for culling. An understanding water company would be an advantage, as you will be doing so many water changes they will think there a leak in the road.
All this, coupled with plenty of time for maintaining the fry in near perfect water conditions and money lots of money for food to feed them.
List of requirements:
Hardware:
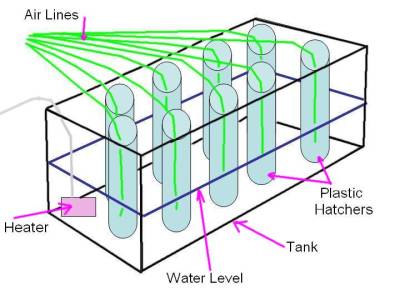
Tank of at least 1000 gallons or several smaller ones amounting to the same volume
Filtration system
Aeration source
Several bowls
Artemia hatching system
Fine mesh nets and culling nets
Food:
A weeks supply of liquifry number 1 red box (25 bottles)
A weeks supply of liquifry number 2 green box (25 bottles)
Brine shrimp eggs 16 oz can 80% hatch rate minimum
Goldfish flake food high protein
Dust food minimum 45% protein, the norm for fry being 55%
Micro pellets minimum 45% protein
Assuming that the newly hatched fry have now been separated from the eggs shells and are located in their new environment of ample water volume (you can never have enough), aerate the water with ample aeration preferably gentle but lots of it. The filter is a good place to aerate. Heat is also a bonus; fry grow quicker in ideal water heated to around 23c. Heat is a worthy thing to do; if you can afford to do it.
As previously mentioned the fry do not need feeding, indeed are not capable of eating via the mouth for the first 2 days but once they are ready for feeding, you must start them on the liquifry number one.
Let me first say at this point, if you think feeding your big fish is expensive you are about to get a whole new meaning to the word "expensive". Fry need feeding every three to four hours and an average spawning will consume one bottle of liquifry every feed at around £3 a bottle with most of it will going to waste, in fact most of the food you apply to fry will appear to go to waste, unfortunately that’s the nature of the beast. This not only will cost you huge amounts of money but will be the ultimate start of your water quality problems.
Liquifry is a solution containing minute particles of food in suspension, shake the bottle and distribute around the tank.
With most folks being out at work all day it inconvenient to feed every 3 to 4 hours so, in my own case I feed as soon as I am up in the morning around 6.00 am , if possible get someone to feed them midday or set a timed feeder, I then feed them as soon as I get in at 4.30 pm, again at around 7:00pm and again before I go to bed late.
Keep this up for the first week. Do not put egg yolk in as advised by many, you will have enough water quality problems without adding rotting egg yolk, beside there is very little nutritional value in egg yolk for young fry.
During the first week it impossible to clean the system without damaging and losing fry. I have devised a trickle in and out system of water running 24/7 (a total loss system). In 1000 gallon system this would be around 200 gpd. The outflow of which is a long tube protruding into the tank with holes in it covered in fine sponge, this stops any fry being drawn out in the exhaust of the water. A good idea is to have the water running in one end and the outflow at the other.
You can also siphon water out with a hose fastened to a pole, this way you can keep the water flowing out while avoiding the fry with the hose/pole.
At seven days or there about, change to liquifry number 2 this is slightly thicker with bigger particles in solution and repeat the above sequence of feeding and cleaning.
At 2 weeks, you will need to do your first cull. This gives you opportunity to do a good clean out as well, as the tank will probably have nitrite showing by now and the stink from it will be unbearable.
The cull first
Capture as many of the fry as you can. Place them in a large bowl, with water from the tank. Place an air stone in there also.
There are two methods of capture I use.
The fry will be stuck to the side of the tank, generally within the first 6-10" of water depth, with a few being on the bottom of the tank. Generally they tend to be on the side high up preferring to be in shallow water rather than down deep. Take a smallish fine mesh aquarium net and waft it close by the sides of the tank moving it over the top of the fry but not touching them, the current created from the net will make the fry fly off the sides and they will move out into the tank several inches, at this point carefully net them up and transfer them to the prepared holding bowl.
The other way is to lightly tap the side of the tank from the outside if possible this will cause the same effect as above with the fry leaving the sides. Repeat the process till most are bowled.
A little perspective here. You will "kill" some fish by damaging them with the net, some will die as the stress factor sets in and some will die as a result of being too weak. You will also miss quite a few and some will go down the drain accidentally with the crud that’s siphoned out of the tank. This is both normal and unavoidable; these fry will be at most a few millimetres long. Remember in the wild most of these fry would have been eaten by predators by now. However harsh this may seem, you should at this point, be well up on Mother Nature.
No matter how hard culling may seem, it’s a necessary evil, if you try to raise a complete spawning you will bit by bit, lose the lot.
For this cull we are simply looking for deformities in any fry. To do this, have another two bowls ready with tank water again to act as a receptacle for the acceptable and non acceptable fry, also a small bowl ready for inspecting the fry.
Carefully scoop a small amount of fry out of the holding bowl and transfer to the small inspection bowl. With a culling net (a small net fine mesh net with a head around 2.5" diameter), carefully select individual fry and transfer to their new tank either as reject or acceptable. Deformity culling will be ongoing in all your culls from now on, no matter what you are inspecting for. And the deformed fry will be self evident being ballooned, twisted, and bits missing, etc. The choice is yours as to which you want to remove for cull. You can either remove the deformed ones and transfer for disposal or, remove the good ones to the newly prepared bowl/ holding tank. Or do both at once.
Once you have them separated your first priority is to get the acceptable ones re-homed ASAP. If you can get a friend to clean the tank while you do the culling so much the better, if not and you are a one man show, make the cleaning the very next job and get these fry settled back in.
What to do with the rejects? This is entirely up to you; if you already have small fish being raised they make good protein food otherwise dispose of them humanely. When the culls get bigger in size, you can feed them to your bigger fish, this is a natural way and would happen in the wild, so don’t be squeamish about it. Just remember if you try and keep everything you will end up likely with nothing.
Once the first cull is over and the liquifry is gone, you are ready to start them on more solid food. This would constitute newly hatched brine shrimp and dust flake food of high protein.
Koi fry, during their development, need lots of protein and if they are deprived of this at the development stage, they will be under developed, and can never catch up again later. They will be more susceptible to disease as well.
Brine shrimp are really easy to hatch and they will hatch every 48 hours.
The method I use is to get a small aquarium and mount a plate in it with 9 holes in it that will hold secure 9 plastic 1.5 litre soda pop bottles upside down (tops down)
Take your soda pop bottles and cut the base off and secure the tops and silicone making them water tight, do this times 9
Fill the tank half way up with water and place an aquarium heater in the bottom set at 23-25c then place the holding plate in the tank with a light over the top
Prepare a saline solution in a 50 gallon drum to 3.5% salinity (same as sea water) a litre of which is placed in every pop bottle and placed into the holding plate in the heated tank water. The bottles should be at least one third under water
So we now have 9 bottles upside down in a tank half full of water that’s been heated to 23c (the saline in the bottles need to be heated, as this impractical they get heat from the surrounding water). Into each bottle pass a small air line with a small air stone right down to the bottom and aerate gentle so as to keep the eggs in suspension.
On the first day, prime three of the bottles with brine shrimp eggs (about a level tea spoon full). On day two, prime three more with eggs. And finally on day three, prime the remaining three with eggs.
At this point on day three, the first three bottles should be hatching so you can start to feed. Pour the brine shrimp into the fry tank salt water as well. Immediately clean the bottle and refill from your saline tank and prime ready for next time in 48 hours. Work your way around the hatching tank with three feeds of brine shrimp per day,
With this system you will always have something hatching. I use a cloths peg/pin clipped on the top of the bottle, when I feed from that bottle I move the peg to the next bottle and then refill the previous one. This way I always know which is the next one to hatch, it will have my peg/pin on it.
The hatchers take there heat from the surrounding water
Newly hatched brine shrimp are highly nutritious even any un-hatched will not be wasted on them.
As well as this and in the interests of getting the fry used to what will eventually be their staple diet, we introduce goldfish flake crushed into a fine powder with your hands. Sprinkle a little on the surface in between brine shrimp feeds and observe the reaction. I will keep this regime going as long as possible bearing in mind we need to get them onto pellets ASAP. The crushed flake will be the first step towards this end.
At all the stages so far, water quality and pollution will be your biggest enemy, with both ammonia and nitrite being present and with fine silt building up over the bottom of the tank. If you can keep the total loss water trickle feed going into the tank and keep siphoning the silt off the bottom this will help minimise these effects. When approaching clusters of fry with the siphon hose, with your other hand put a kink in the hose to stop the siphoning while you scoot them out of the way once they are gone release the kink in the hose and continue siphoning the junk out.
I always siphon into another tank, this way any fry that gets sucked up the hose I can go and retrieve them after the dust has settled. Be aware though, with that amount of junk in possibly, a smaller container you have not got long, the ammonia will build in a very short time and the longer the sucked up fry are contained there, the less their chances of making it out alive.
We have now had these fish for around one month they will be around 10 -15 mm by now and nearly ready to go onto very high protein macro pellets. If you have a mud pond they are not to far away from the point of release into the pond, but first at one month we need to do yet another cull.
The cull at one month will yet again be for deformities and we can start doing some fundamental grading for what we want to achieve.
I am still learning this skilled process and I would not presume to insult people who do this for a living with respect from the grading aspect. I would not know a tategoi fry at this point if it ran over my chest while sunbathing
With this in mind, what are we looking for?
The obvious ones are deformities already covered above, but, pay attention to the cosmetics of the fish; some will not develop gill covers and or fins, big dropping bodies and stomachs.
We are also looking for bigger than the normal size fry for their age; these are called Tobi's and are cannibal. They get to this size by eating their siblings, these must be removed or isolated. By now a lot will be showing colour, and here's what I know about this, which is not much.
In a kohaku spawning you are looking for beni developing on the koi. Showa and Shiro Utsuri you want to save all the dark or black ones. In sanke you are looking for red and black mottled effects
So in short, you are safe to get rid of the *all* white ones with any of the above type of spawning, these are known as muji. While being worthless you can always give these away as pond fillers.
Continue to feed increasing the size of pellet over the coming months, doing your routine culls, separating the wheat from the chaff until you work up to small pellets size.
Keep on monitoring your water quality and correcting it as needed
Eventually you need to end up with just a handful of your best fry to raise in as much water as possible before they can go into your main pond, unless you have a huge mud pond in which case you can keep higher numbers.
If you learn nothing else from this, be aware:
- Water quality will be the bane of your life while you raise fry
- Feeding them takes huge amounts of time and money
- Breeding is not only very time consuming but it is back breaking as well
- You could still end up with rubbish fry, hopefully you won't
- It is very rewarding and you will have lots of friends